


Kiến thức cơ sở
How do I verify correct graphics settings for SURFCAM?
SURFCAM® uses the latest version of DirectX® technology from Microsoft’s ActiveX® technology suite. The move to use ActiveX vs. Open-GL is due to its broad support of modern color cards supporting this technology, modernization, and capabilities.
Color Quality
When shading a model a color setting of Highest(32 bit) will provide the desired quality. A lower setting will appear as if there are distinct bands of color. A gradient background will also reflect this.
To change the color quality (These steps apply to Windows XP®. Windows Vista® may differ slightly):
- Right-click on the desktop and selecting Properties from the menu.
- Select the Settings tab from the Display Properties dialog.
- Select the Highest (32 bit) selection from the Color Quality list of choices.
- Select OK.
Hardware Acceleration
Windows uses hardware acceleration to improve display performance. If SURFCAM fails to start or the graphics are slow to react increasing the hardware acceleration can resolve the problem. Hardware acceleration for your graphics hardware has six settings. The following table shows the settings and their meanings:
| Setting | Description |
|---|---|
| None | Disables all accelerations. Use this setting only if your computer frequently stops responding or has other severe problems. |
| 1 | Disables all but basic accelerations. Use this setting to correct more severe problems. |
| 2 | Disables all DirectX® Graphics accelerations, as well as all cursor and advanced drawing accelerations. Use this setting to correct severe problems with DirectX accelerated applications. |
| 3 | Disables all cursor and advanced drawing accelerations. Use this setting to correct drawing problems. |
| 4 | Disables cursor and bitmap accelerations. Use this setting to troubleshoot mouse pointer problems or corrupt images. |
| Full | Enables all acceleration features. This setting is recommended if your computer has no problems. |
To change hardware acceleration (These steps apply to Windows XP®. Windows 7® may differ slightly):
- Right-click the desktop, and then click Properties.
- In the Display Properties dialog box, click the Settings tab, and then click the Advanced button.
- Click the Troubleshoot tab, and then choose the desired level of hardware acceleration. For best results choose Full.
NOTE: If you use multiple monitors, changing hardware acceleration settings affects all monitors.
Video Card Drivers
The video card must be DirectX® 11.0 compatible. The latest video drivers should be installed. Most video card manufacturers provide the ability to download drivers from their website. If you know which card you are using you can, in most cases, access driver updates by answering a few simple questions.
nVIDIA® chipset drivers can be downloaded here.
ATI® chipset drivers can be downloaded here.
If unsure about how to update the video drivers there are other steps available that can automatically update the system (These steps apply to Windows XP®. Windows 7 may differ slightly):
- Select start
- Select Control Panel
- Switch to Classic View
- Select Administrative Tools
- Select Computer Management
- From the tree in the dialog that has opened select Device Manager
- Expand Display Adapters
- Right-click on the current adapter
- Select Properties
- From the Driver tab the "Update Driver..." button can be chosen to install the current Microsoft provided driver.
Another method available that can automatically update the system
These steps apply to Windows XP®. 7 may differ slightly
- Select start
- Select Control Panel
- Switch to Classic View
- Select Display
- Select the Settings tab in dialog that has opened
- Select the Advanced button. Depending on your video card and existing driver setup there may be a tab specifically suited for configuring maintaining it. From this tab it may be possible to update the driver from the supplier’s web site.
- From the Driver tab the "Update Driver..." button can be chosen to install the current Microsoft provided driver.
Diagnostics
The Microsoft DirectX® Diagnostic Tool gives information about the DirectX® application programming interface (API) components and drivers on your system. It enables you to test sound and graphics output and Microsoft DirectPlay service providers. It also enables you to disable some hardware acceleration features.
You can use the diagnostic tool to gather information for a technician during a support call. You can save the information gathered by the tool and paste it into an e-mail message.
To run the Microsoft DirectX Diagnostic Tool:
- Click start
- Click Run…
- A dialog will appear. Type “dxdiag” and select the OK button
The Diagnostic tool will load and scan the system for information. When finished it will display similar information as in figure 1. In most cases it would be best to review what version of DirectX® is installed, 4.09.0000.0904 or later is required.
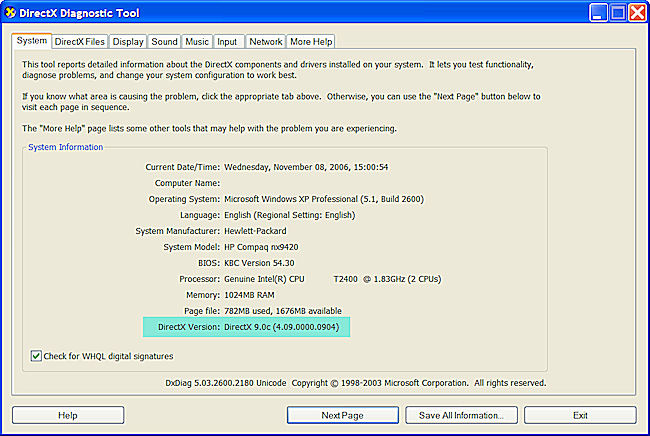
Figure 1
The second tab in the diagnostic tool dialog checks the validity of the DirectX® file set. Optimally the Notes at the bottom of the dialog should report that there are no problems found as show in Figure 2. If problems are found, it is recommended, depending on the note itself, that DirectX® be reinstalled.
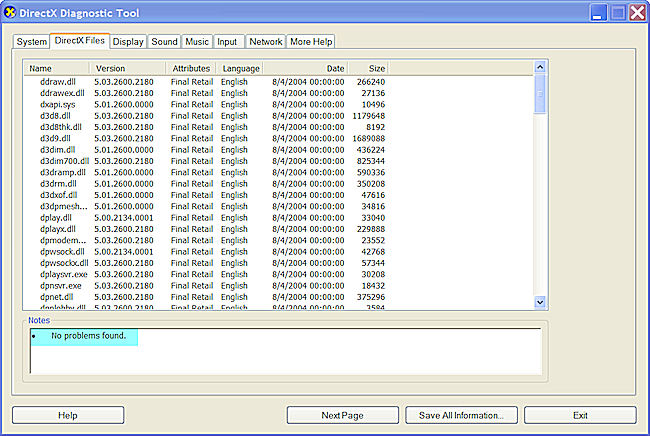
Figure 2
The third tab in the diagnostic tool dialog checks the color card device, its driver, and provides testing tools. Optimally the Notes at the bottom of the dialog should report that there are no problems found as show in Figure 3. From this dialog it is important to verify that the minimum video requirements are met. Direct3D® should also be tested. When the Test Direct3D button is pressed the system will offer to test the three different hardware-accelerated interfaces. Although interface 9 is the requirement, testing interface 7 and 8 is recommended. At the bottom of the dialog the test results will be listed offering useful information.
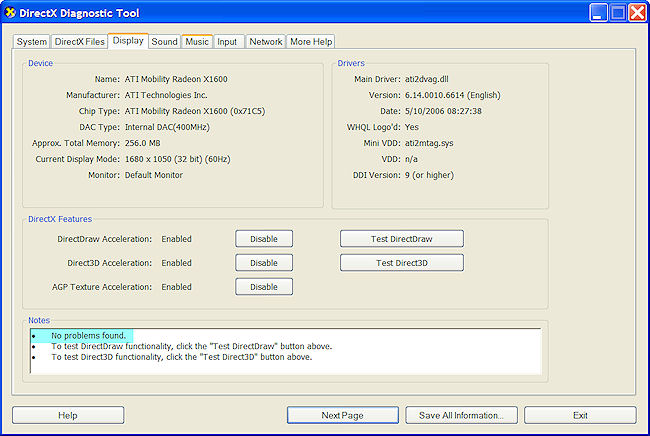
Figure 3
The last tab in the diagnostic tool dialog offers additional troubleshooting tools (Figure 4). Selecting the Troubleshoot button will attempt to diagnose problems using a wizard-style process.
If all the diagnostics fail to offer a solution then it is recommended that the "Save All Information..." button be chosen to generate a detailed system description that can be sent to the appropriate support provider to evaluate.
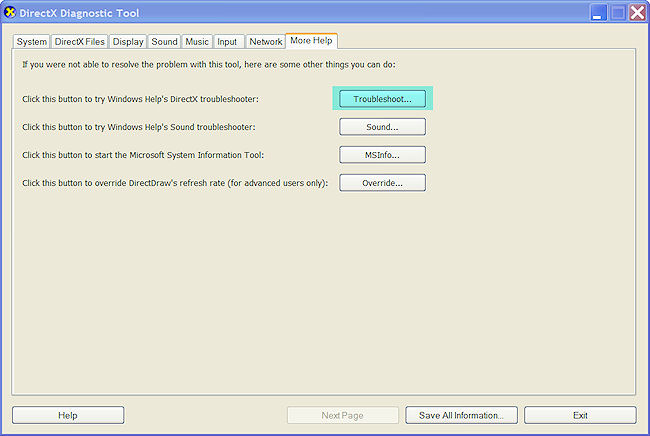
Figure 4